
Do you want to know how to customize WordPress block styles in the Site Editor? This guide will walk you through the different ways of doing it.
We’ll cover:
- The standard ways to customize blocks in the WordPress block editor.
- How to customize WordPress blocks with the help of a theme, plugin, and custom CSS.
How can you customize WordPress block styles?
The WordPress block system supports a wide range of designs. You can use it to build all kinds of websites, from blogs, portfolios, and service business sites to ecommerce stores. The theme and plugins you use can also add extra customization options.
And where your preferred design can’t be achieved with the default controls, themes, or plugins, WordPress lets you add custom CSS for more specific styling.
The point is that there are so many options for customizing WordPress block styles. So let’s explore them so that you know the full extent of what’s available to you.
Customize WordPress blocks using block editor controls
You’ll often find most of the controls you need built in the Gutenberg block editor. This is the standard way of customizing your page or post’s blocks. The customization controls you access depend on the block you’re editing, although some controls appear universally across several blocks.
Use the block toolbar for quick adjustments
Block toolbar settings appear right above the block you’re editing when you select it. In this toolbar, you’ll find settings to edit, format, move, or change the block.
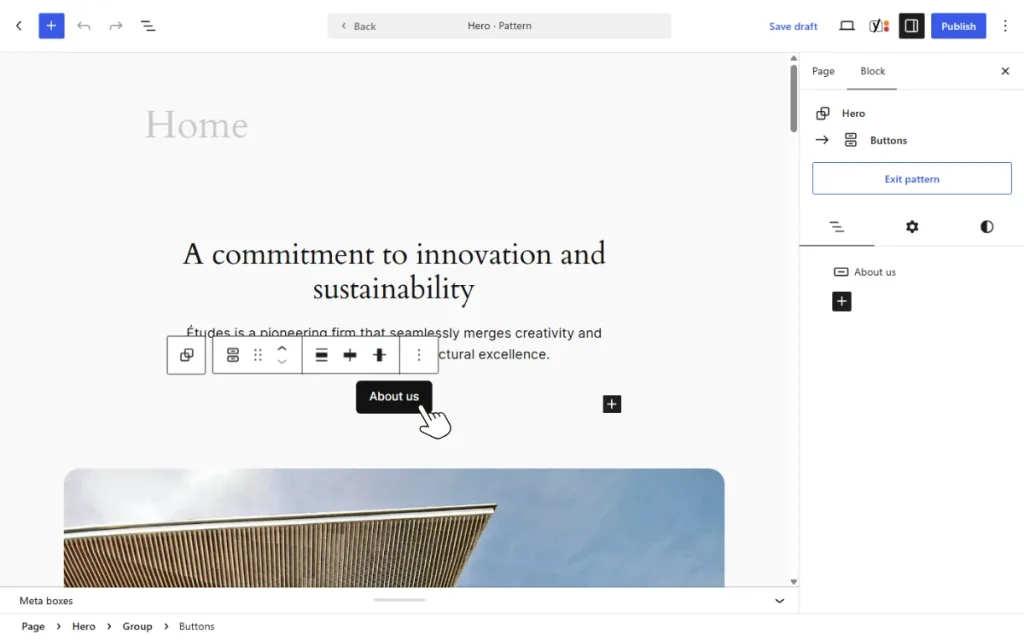
The first few columns of this toolbar contain controls that appear for pretty much every block. For example:
- Select parent block.
- Drag.
- Move the block up or down the page.
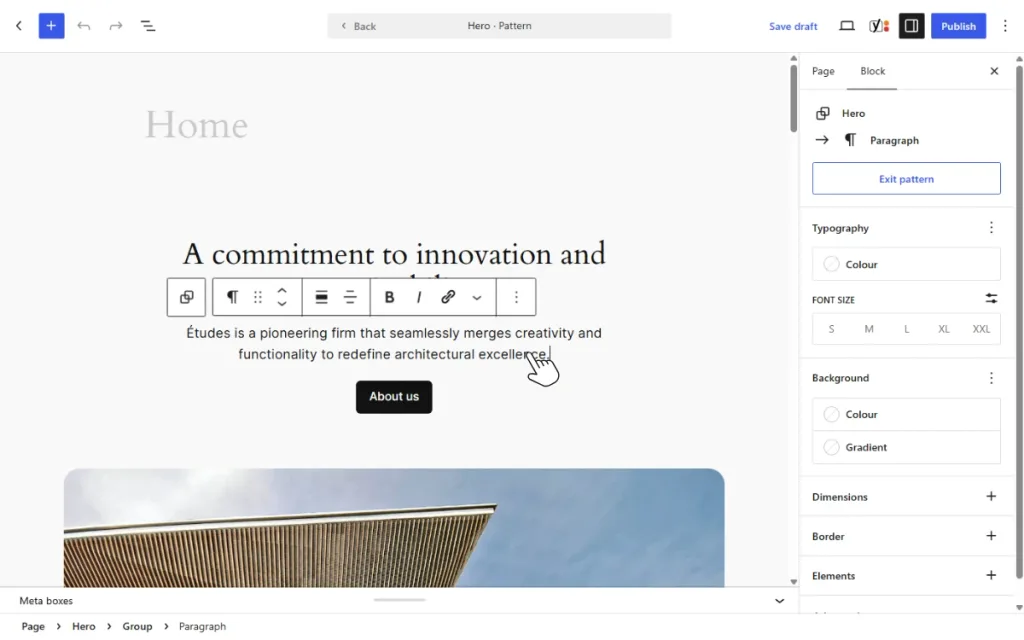
The subsequent columns contain controls that only appear for certain blocks. For example:
- If you’re editing a paragraph block, you’ll see text alignment as well as options to make the text bold, italicize it, or add a link to the text.
- For the image block, you’ll see cropping, caption, and apply duotone filter controls.
At the end of this toolbar, an options button lets you add settings like copying and pasting the block’s styles. These appear for every block and are useful if you would like to apply the specific block’s styling to another.
Customize blocks from the settings sidebar
Most block customization options in the Block Editor are in the settings sidebar. When you select a block, these controls will appear on the right sidebar. But if you don’t see this sidebar, click the Settings icon on the top right. Then, click on the Block tab.
The settings you see depend on the block you’re editing. Let’s say you’re editing a paragraph block. You’ll see these settings:
- Typography for changing the color and font size.
- Background for editing the background color and gradient.
- Dimensions for margins and padding.
- Borders, shadows, item justification, etc.
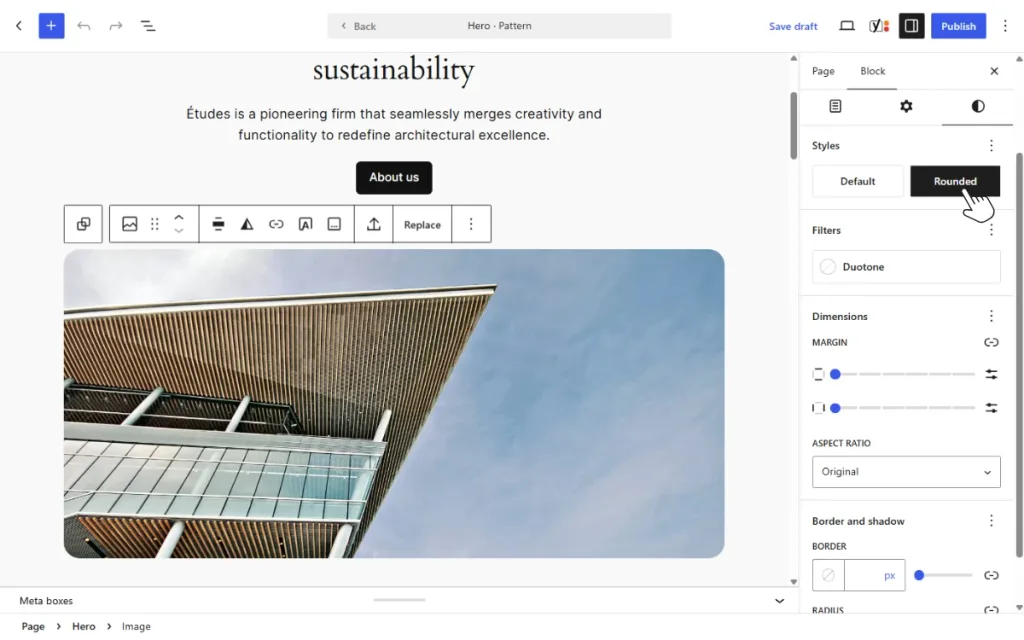
For an image block, there are additional settings, for example, adding a filter, choosing an aspect ratio, and setting the height.
Show more block settings
Some block settings panels have a three-dot options menu. Clicking on this menu reveals additional block settings. For instance, the typography settings panel has an options menu with extra settings for line height, letter spacing, text decoration, etc.
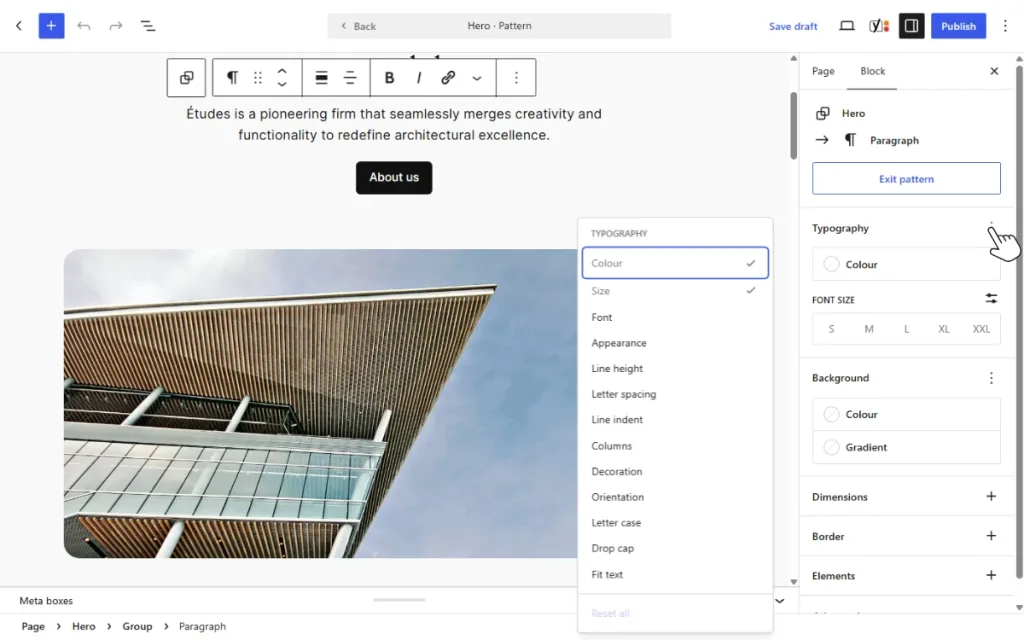
Resetting all settings
Suppose you’ve made an edit you don’t quite like and you would like to revert to what the block was before you made the edit. You can use the Reset all button at the end of the three-dot options menu to do this.
Block style variations
Blocks such as Image, Gallery, Separator, and Buttons include style variations. These are pre-set styling options you can select in a single click. You can preview each style by hovering over it. Once you find what you like, you select it. Style variations appear above the block customization controls under Styles.
Tip: When editing blocks, use the Document Overview to check the block name and ensure you’ve selected the right block. Otherwise, you could be stuck wondering why you aren’t seeing the controls you expect.
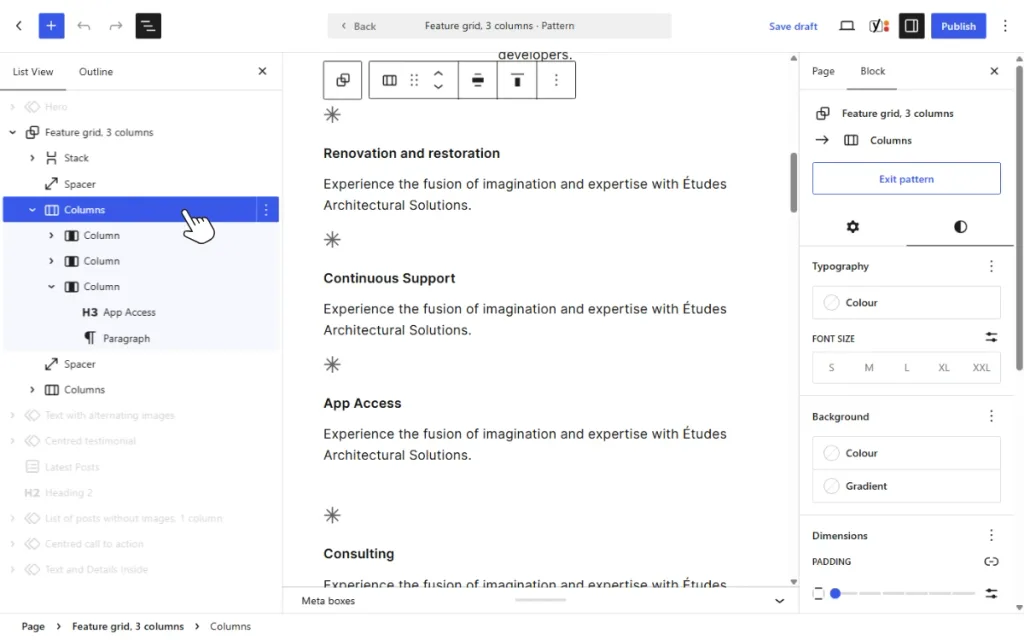
The Document Overview button is on the top left, next to the Undo and Redo buttons. You should also use these buttons (Undo/Redo) to reverse or restore the changes you’ve made.
Customize blocks using global styles
With Global Styles, you can control the appearance of blocks across your site from one place, instead of styling each block individually.
Let’s say you want all your buttons, headings, and paragraphs to have the same styles. Instead of adjusting each element separately across your site, you can use Global Styles to design them once. Then override these styles for individual blocks when you need to. You can access Global Styles by navigating to Appearance → Editor → Styles.
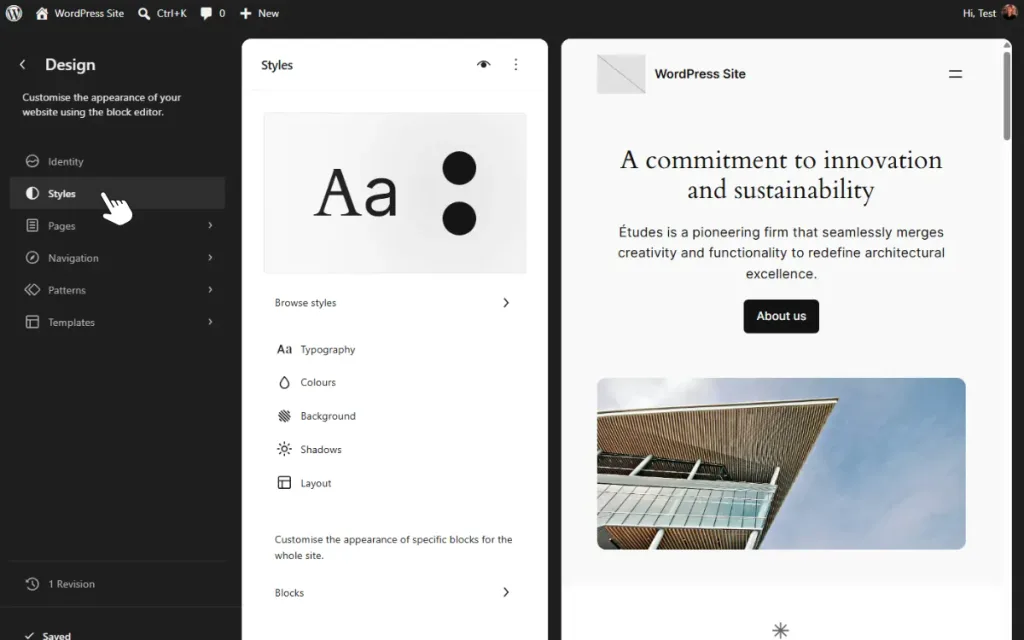
From here, you can set:
- Site-wide styles. For example, default colors and layout options.
- Styles for specific types of blocks. Under Blocks, you can select a specific block and set specific styles to be applied whenever you use the block on a page or post.
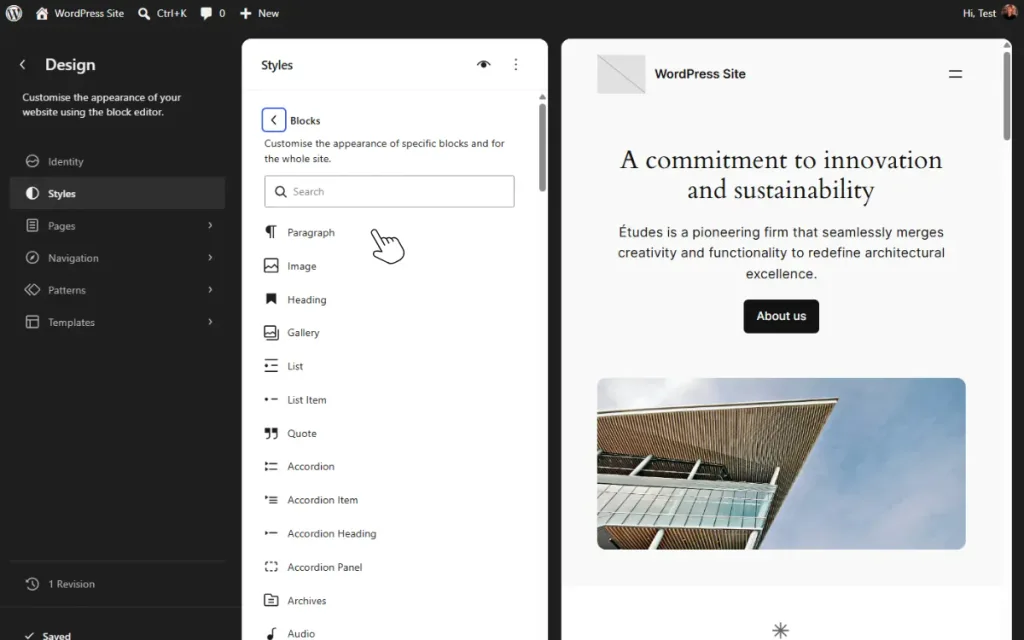
Note: If you’re editing a button on a page, you’ll have the option to apply its styles globally in the block sidebar controls.
Global Styles ensure your designs are consistent throughout your site. You don’t need to repeat the same block designs and risk introducing inconsistencies.
The Block Editor provides you with numerous controls to customize WordPress block styles. Your block theme and a plugin can take it further, giving you more flexibility and options.
Customize WordPress block styles using a WordPress block plugin and theme
Block themes like Ollie are built to work with the Block Editor. They’re designed to take full advantage of its capabilities, especially Full Site Editing. For customizing block styles, block themes typically establish your design system, for example, by setting up a color palette, typography, and other default block styles.
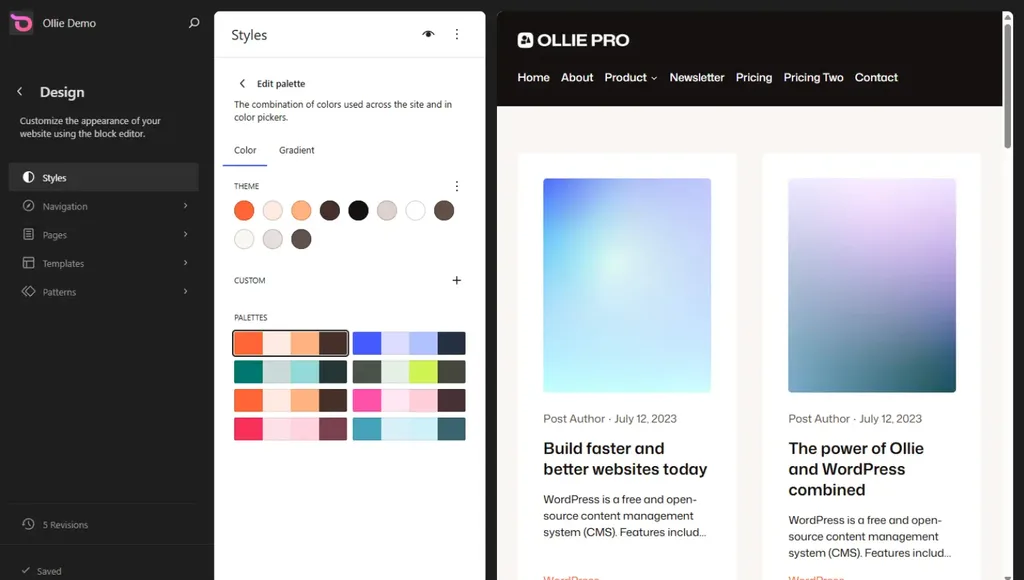
Use the Ollie theme to establish a design system for your blocks
Ollie is a free WordPress block theme designed for the native WordPress block editor. This theme adds an intelligent design system that makes it easy to customize WordPress block styles as you build your site.
This system includes:
- A typography system made up of curated font pairings that are responsive out of the box. You won’t need to go through the hassle of resizing fonts for smaller screens, but you can still tweak them if you want to.
- A smart color system. You can select a color palette in Global Styles inside the Site Editor. When you do this, a consistent set of color options will be available to you as you design your blocks in the Block Editor.
- A consistent spacing scale. This helps you set consistent spacing for dimensions like margins and padding, block spacing, etc.
- One-click style variations. You can swap your color palette and typography for blocks such as Button in just one click instead of redesigning the block.
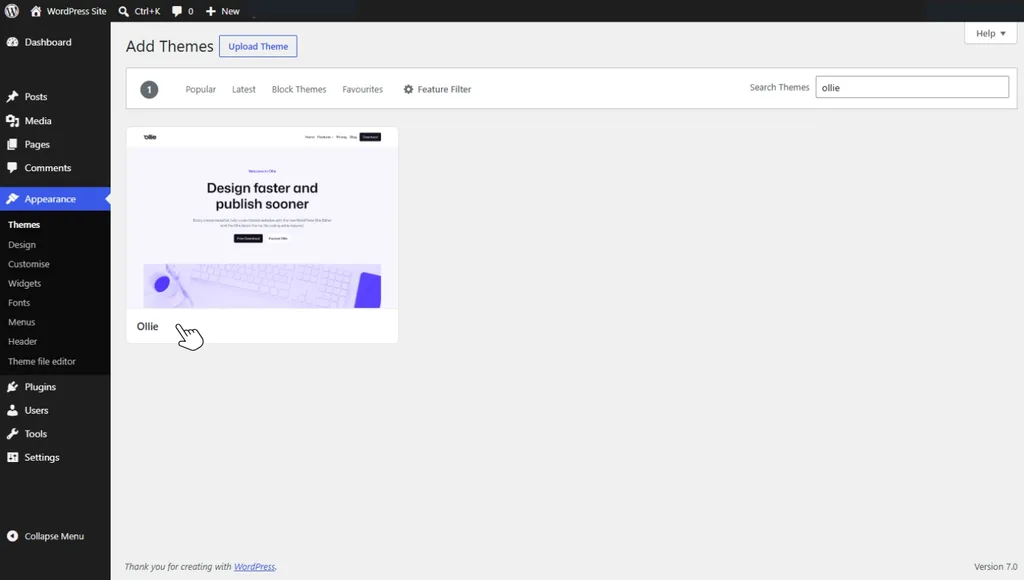
The free Ollie theme lets you establish your site’s design system and configure some global styles for your blocks. You can extend this and add more controls, settings, and blocks to the Block Editor with Ollie Pro.
Extend the Block Editor’s block styling controls with the Ollie Pro plugin
Ollie Pro extends the native Block Editor, giving you more flexibility over how you design your blocks with additional design tools for core blocks.
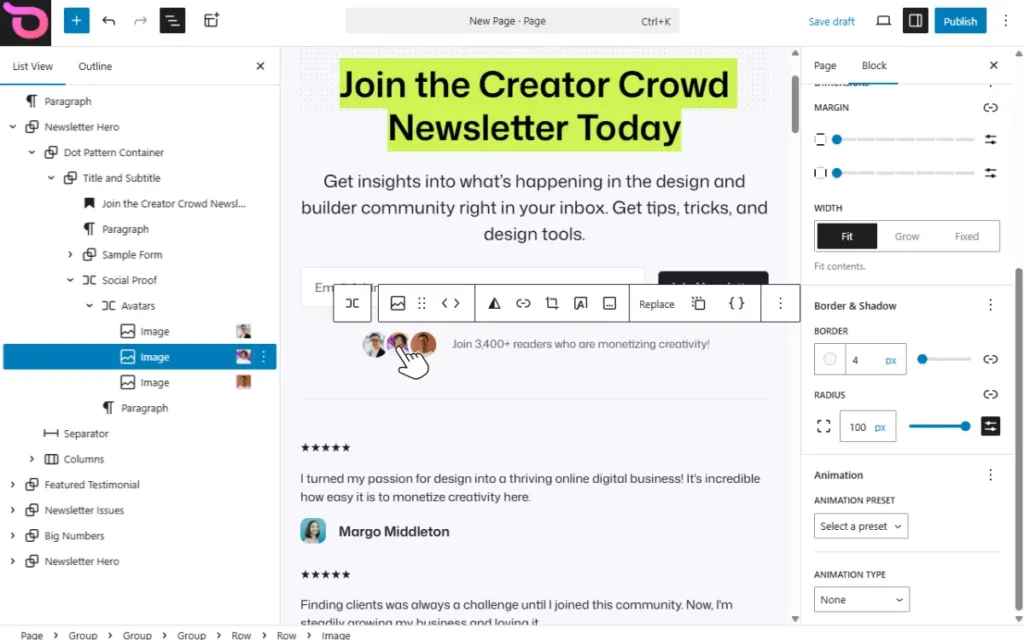
It also adds blocks and settings missing in the native Block Editor, which are essential in building well-designed WordPress websites. These are features that you usually need to write custom code or install extra plugins for. But with Ollie Pro, you get them as WordPress block editor extensions.
They include:
Animation Designer
Ollie Pro adds controls for adding different types of animations to your blocks, including:
- Entrance animations such as fade in or fade in up, down, left, and right.
- Zoom effects.
- Scale on hover effects.
If you create animation combinations you like, you can save them and reuse them for other blocks in your site. You do all this without writing any code.
Carousel Designer
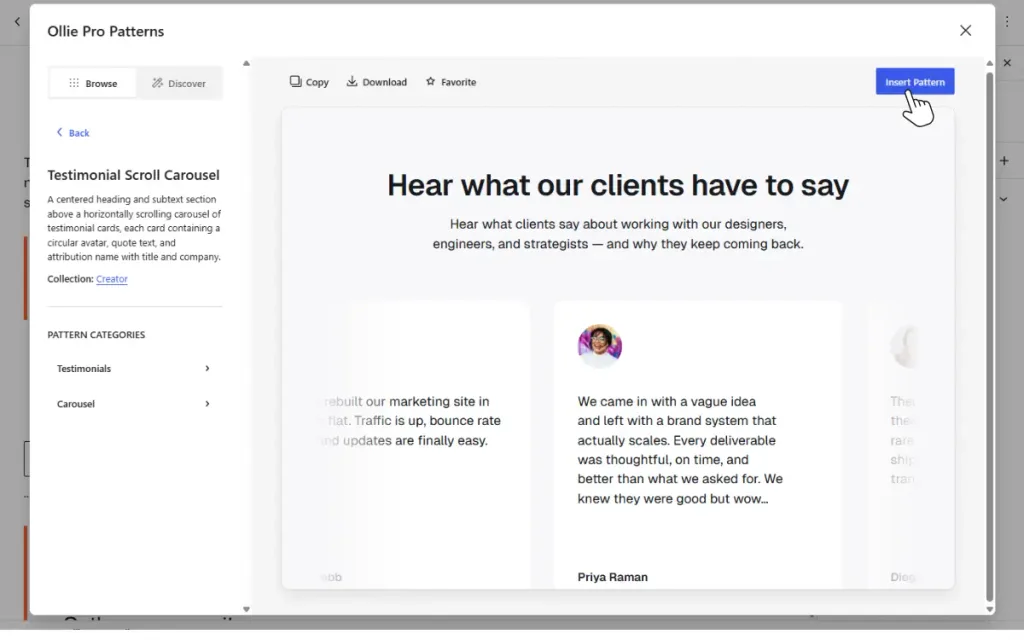
Carousel Designer in Ollie Pro adds a carousel block and controls to customize it in the Block Editor. You can use this to build testimonials, hero sliders, logo marquees, and even a latest post slider without having to install a dedicated carousel plugin.
Menu Designer
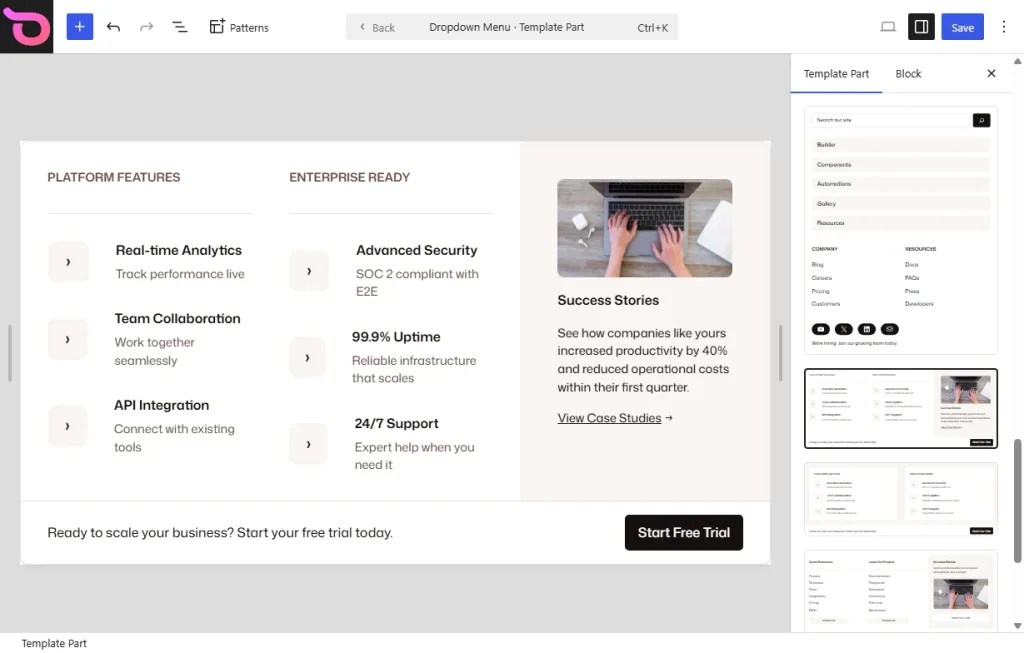
This lets you design dropdown menus and mobile menus using the Block Editor. You can add different types of elements, including buttons, images, etc., to build mega menus for your site without writing any code.
Advanced column controls
The ‘stack on mobile’ control for columns is available in the Block Editor by default. However, you have no control over the order in which they appear. The advanced column controls in Ollie Pro let you choose the order in which these blocks appear on mobile devices.
Note: Ollie Pro has an extensive block pattern library. You can browse it, insert patterns you like into your page or post, and then customize the individual blocks in these patterns to your liking.
Ollie Pro offers many more Block Editor extensions that we haven’t covered here. One of them is Class Manager, which is extremely useful if you’re using custom CSS to style blocks.
Customize WordPress block styles using custom CSS
In some cases, Block Editor controls, your theme’s styling, and plugins may not be able to give you the look you’re after. For example, you want a special hover effect that isn’t available in the options we’ve covered so far.
In this case, you can add custom CSS to your blocks through the Block Editor. Custom CSS gives you complete freedom over how to design your blocks, provided you know how to write CSS code. There are three main ways to do this.
Using custom CSS per block
Custom CSS per block was introduced in WordPress 7.0. This feature lets you add custom CSS to a specific block. It is useful when you want to style a specific block, but you don’t want to reuse the styles elsewhere.
In other words, it’s ideal for one-off adjustments that you don’t need to use for any other block. To add custom CSS per block:
- On the page you’re editing, open the Settings right sidebar and click on the Block tab.
- Scroll down to the Advanced section and click to expand it.
- Add your CSS code in the Additional CSS box.
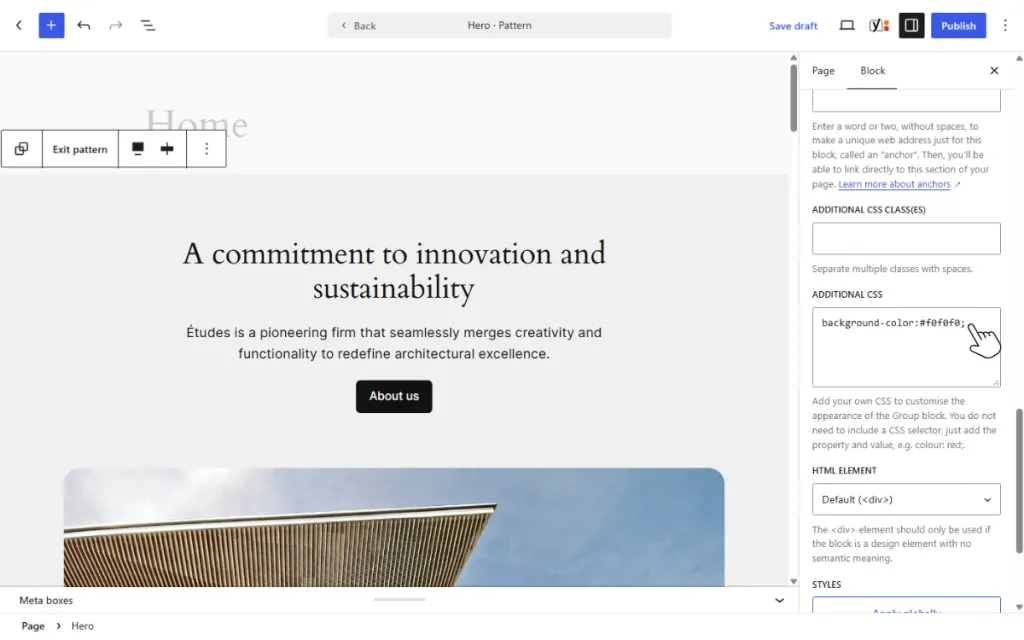
The code could look something like this:background-color:#f0f0f0;
When using custom CSS per block, you don’t write CSS classes, and that’s why the code lacks a selector. WordPress targets the particular block instance automatically.
Adding CSS targeting a block type globally
Suppose you want your custom CSS code to apply to a specific block whenever you use it in your site. For example, a special hover effect for all your buttons.
To do this, you can add custom CSS globally for that block by:
- Navigating to Appearance → Editor → Styles.
- Selecting the specific block under Blocks.
- Scrolling down to Advanced and adding your code under Additional CSS.
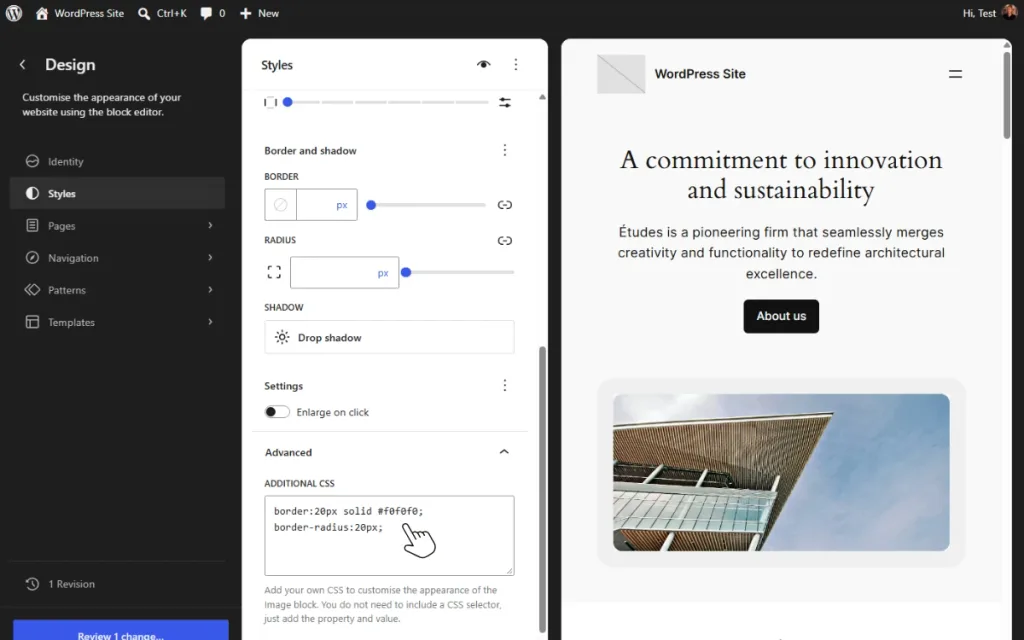
These two are ideal for simple design tweaks with CSS and also when you don’t need to reuse the CSS code for other blocks. But if you want your CSS code to be reused by several blocks across your site, you’ll need to create CSS classes.
Use CSS classes for your custom CSS
Here, you create a CSS class and write CSS code for that class. Then, when you want to reuse the styling rules for that class for a particular block, you simply add the class name.
Here’s how you do it:
- Add a class name in the Additional CSS Class(es) field; something like ‘service-card’.
- Navigate to Global Styles by going to Appearance → Editor → Styles. Then click on the three-dot options menu and select Additional CSS.
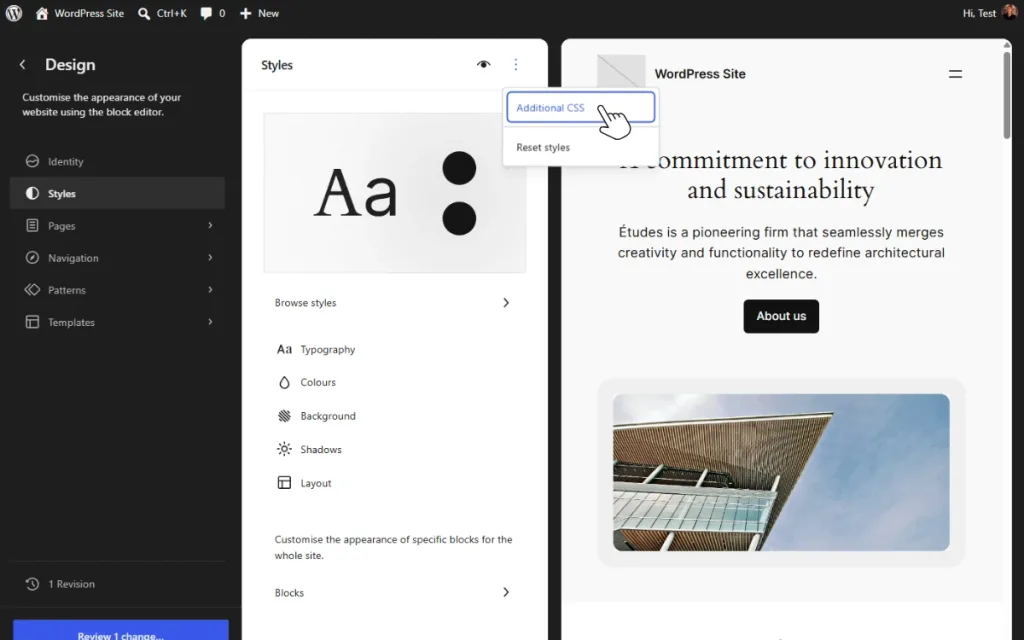
- Write your CSS rules here. It should look like this:
.service-card { background-color: #f5f7fa; padding: 24px; border-radius: 12px; box-shadow: 0 4px 12px rgba(0, 0, 0, 0.08);}
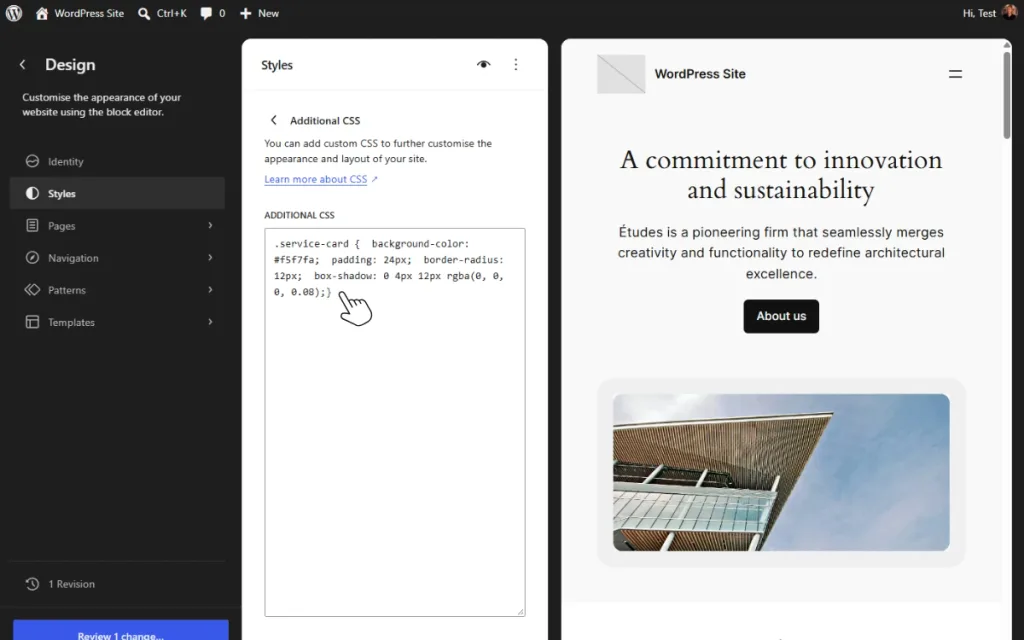
Notice that the class name is added at the beginning, unlike when you’re working with custom CSS per block.
After saving, the styles will apply to every block with this class name in the Additional CSS Class(es) field.
What are the challenges of managing CSS classes in the Block and Site Editors?
Managing CSS classes this way may work fine for you if you only have a few lines of CSS in the Additional CSS field. But this can become unsustainable quickly for a few reasons.
- Where you add class names is separated from where you define the actual styles. If you want to change something, you have to go back and forth between the block settings and the Additional CSS field in Global Styles.
- As you build more pages, class names can accumulate, and over time you end up with a large collection of classes that are difficult to maintain.
- You may not know what each class does from the outset; it’s easy to have multiple classes basically doing the same thing.
Ollie Pro’s Class Manager brings classes and styles together in one place, making it easier to manage your CSS classes.
Manage CSS classes more efficiently with Ollie Pro’s Class Manager
Class Manager provides you with an intuitive interface for managing all of your custom block styles in one place. It works seamlessly with the Block Editor; you can access it using the command palette, block toolbar, or the advanced section of block style settings.
You never have to leave your design workflow when using Class Manager. Inside Class Manager, you can:
- Create CSS classes and add styling from a single interface. No more switching between the Block Editor and Global Styles when working with custom CSS.
- Write CSS code for different pseudo-states. Including hover, focus, active, and disabled pseudo-states.
- Find and assess your classes. You can search for the classes you’ve already created and assess their CSS code. This helps you prevent having different classes with the same code.
- Find out where your classes are being used. Class Manager has a Class Usage section that shows you where each class is being used on your site. By using this feature, you can avoid forgetting where you’re using specific classes to avoid unintended styling changes.
- Tap into your theme’s design tokens. Take brand colors stored by your theme in the theme.json file. Using the Variables button, you can access these colors and insert them in your CSS code in a single click.
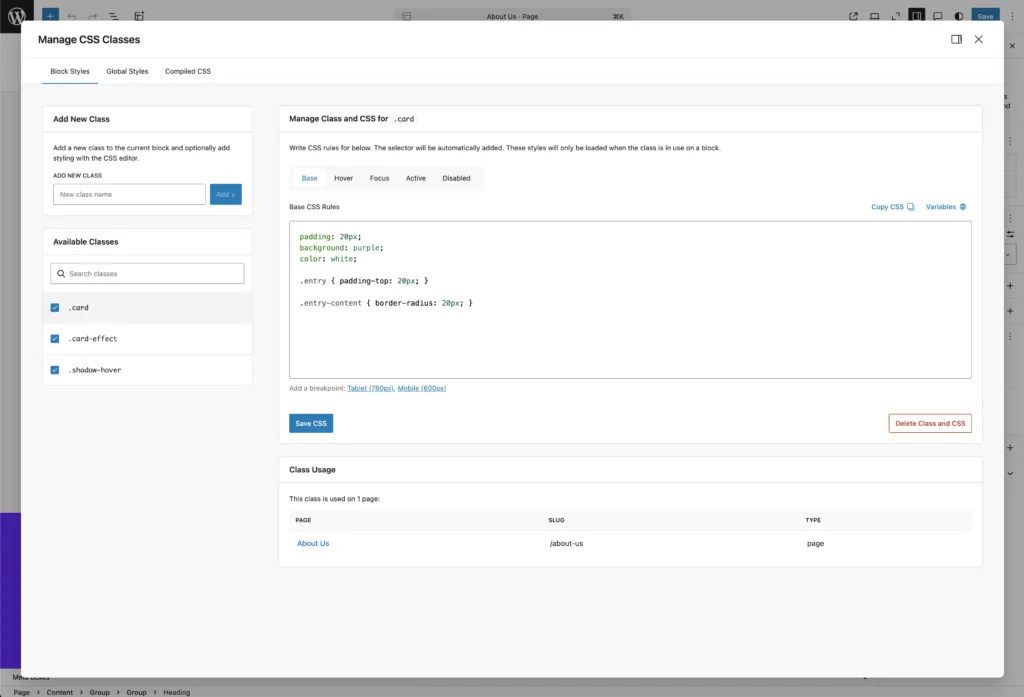
When applied, block styles will only be loaded when the class is used for a block on the page being loaded. They don’t load for every page, which is good for performance.
With Class Manager, you have a smart system for managing all your classes and working efficiently with custom CSS.
Get to grips with WordPress block styles today
You have plenty of options to customize WordPress block styles to achieve the design you want. The Block Editor provides you with numerous controls for designing each block in the WordPress blocks system.
Block themes such as Ollie build on this and help you establish a design system that makes it easy to customize blocks as you build your website. The Ollie Pro plugin extends the Block Editor with powerful design tools such as Advanced Column and Grid Controls, Animation Designer, Menu Designer, etc.
It also adds the Class Manager extension to the Block Editor. This helps you manage CSS classes and use custom CSS more efficiently in WordPress.
Use the Ollie theme and Ollie Pro to customize WordPress block styles faster and more efficiently.
